Preventive Maintenance Planning & Scheduling
Preventive Maintenance is the backbone of a productive, profitable heavy civil construction company. As a matter of fact, keeping assets in the field running and maximizing utilization is, in large part, the Shop Manager’s main focus and a large piece of the profitability puzzle. The modern Shop Manager must analyze the fleet and the capabilities of Mechanics and put the tools in place to maximize the capability to deliver. These are the key elements to think about to manage the Preventive Maintenance process:
- How do I set up Preventive Maintenance?
- How do I know when it’s due?
- What’s my lead time?
- What are my goals?
- What do I need to report on?
The Preventive Maintenance Undercarriage
A world-class Computerized Maintenance Management System (CMMS) must have the capability to automate the Preventive Maintenance (PM) process. This begins with a thorough understanding of your fleet; things like equipment type, manufacturer, age and maintenance history. Understanding the capabilities of your business to bring the equipment into the shop, and the timing associated with that, is important as well. All of this data should be available to enter into the CMMS when setting up your Programs. Setting up Programs should not be done on a broad level. Look for trends in PM schedules across your fleet. Reviewing the PM schedules of your equipment and looking for trends or similar schedules can help you decide what equipment should be grouped together in a Program.
For example, if most of your equipment follows the 250-hour, 500-hour, 750-hour, and 1,000-hour PM Schedule, then it may be easy to create Programs by types of equipment with these basic intervals. If your company has a diverse fleet, then you may want to think about creating Programs specific to the trends identified; each with its own set of Intervals. Some companies take it as far as creating a Program for each specific piece of equipment. Although this may take a lot of work, it may pay off in the accuracy and adherence to the equipment maintenance schedules.
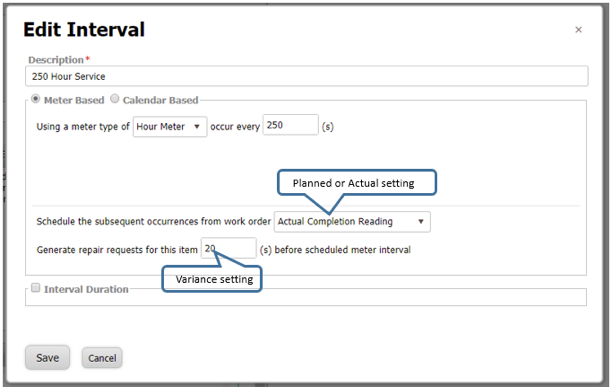
Once the Programs are set up, looking at what your lead time needs to be to get the equipment in the shop, perform the maintenance, and return it to service is what is referred to as the Interval Variance in the B2W Maintain CMMS. This variance lets the system know that you have a certain lead time for each individual Interval in a Program. Setting the right variance will tell B2W Maintain to generate the Program Maintenance Request early enough to allow for the calculated lead time needed to stay in adherence with your PM schedules.
For example; if 250-hour service is due, and you know it takes a minimum of 20 hours to get the equipment in the shop, get the work done and return it to service, then you will set your variance for the 250-hour Interval to 20 hours. This means that the 250-hour Maintenance Request will be generated by B2W Maintain automatically 20 hours previous to the actual 250-hour mark or 230 hours from the last time that interval was done. Keep in mind that the type of service and the tasks associated with it will also help in determining the variance on your Program. Each Interval, as there are more tasks and they get more complex, could have a longer variance timeframe. B2W Maintain will react appropriately to each, individual Interval.
Each shop completes work differently. B2W Maintain provides two options to calculate when the Intervals in a Program are due; Planned Completion and Actual Completion. This setting will be determined by how quickly PM work is completed.
For some shops, the Planned Completion setting may be appropriate. This setting will calculate when the next time the Interval is due based on when the previous one triggered. For example, If my 250-hour Interval triggers at 1,250 hours, the Due On meter reading for the next time that 250-hour Interval is due will be 1,250 + 250 (or + 230 if a 20-hour variance is used).
For other shops, the Actual Completion setting may be more appropriate. In this case, If a 250-hour Interval triggers at 1,250 hours, and I don’t get it done until 1,280 hours, the Due On meter reading for the next time that 250-hour Interval is due will reflect 1,280 +250 (or + 230 if a 20-hour variance is used). Most companies prefer this setting. This allows maximizing the life of the equipment fluids and not changing fluids too often.

Does This Look Level to You?
Most preventive maintenance Intervals for service are intertwined. In other words, the 500-hour service includes the 250-hour service and some other requirements. The 750-hour service may include another 250-hour service and some other requirements. There is almost a nesting quality of the PM schedule. Knowing that most Intervals of a PM Program are variables of one another, the shop manager may not want the redundancy of PM Requests if he/she knows that relationship.
B2W Maintain allows the flexibility to approach this in two ways. The first is to set a Level on each Interval in a Program. Levels in Maintain have a hierarchical relationship; the higher the Level, the higher the priority when Intervals collide. To illustrate this, we know that the 250-hour Service will trigger a PM Maintenance Request every 250 hours, but, do we really want a 250-hour PM Maintenance Request AND a 500-hour PM Maintenance Request to deal with? If the answer is no, then Levels are used. Each Interval is assigned a Level. The more frequent the PM Service is, the lower the Level number is.

In the above example, the 500-hour PM Maintenance Request will trigger when the appropriate meter threshold is crossed, but B2W Maintain will suppress the 250-hour PM Maintenance Request from triggering, because it is included in the 500-hour PM Service. This relieves the administrative cost of managing redundant PM Maintenance Requests.
The second approach is to not use Levels at all. In this case all PM Intervals will be set to Level 1. This will ensure that a PM Maintenance Request is triggered by the system regardless of the redundancy. Some smaller companies prefer this approach, because their fleets are not so big that it creates administrative issues.
Rules to Live By
Setting up your Programs for proper scheduling requires forethought and analysis. Best practices for this are:
- Do not mix Interval types in your Program – It is ok to set up Intervals to rely on an Hour Meter and a date (500 hours or 3 months). However, because of the nesting nature of the PM Schedule, it is best to create separate Programs for things like yearly registrations, monthly inspections, etc. The key here is to set up a Program for each month of the year and add the equipment to the respective month Program that the registration or inspection is due. Each Program should be setup with Intervals that have a nested nature to them.
- Let the system do the thinking – Because of the nature of Preventive Maintenance and the fast paced activity of your fleet, activity displayed in the CMMS may appear out of sync when, in reality, the system is already looking ahead at the next Interval of service that is due and is simply waiting for the proper meter reading to be logged in the system to recalculate or generate a PM maintenance Request.
- Manually triggered PM – Although convenient, it is not a best practice to manually trigger PM Maintenance Requests outside of the schedule already setup in B2W Maintain. Maximizing the fluid used with each service will save money and increase utilization of the equipment – the equipment won’t be pulled out of the field as often.
Get ‘er Done
Now that we have our Programs set up with all of the nuances needed for planning effectively, we can concentrate on the proper Preventive Maintenance work policies. Most companies have dedicated PM Mechanics that focus on only Preventive Maintenance work. This is based on business need and is not a requirement.
By John Kane
John is a Product Manager for B2W Software.
 |
|
